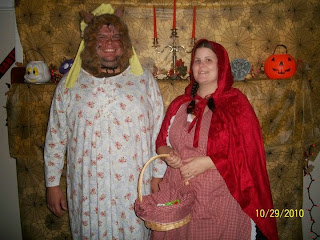
After much deliberation over a fun couple's costume, we decided on Little Red Riding Hood and the Big Bad Wolf.
First I looked at a pattern to make a Little Red Riding Hood costume (couldn't find a premade maternity one at the stores), but thinking of my time, sewing skills, and budget, I decided to make the hood and apron and wear clothes I already had.
for the hood, I used a hoodie, laid it with the top of the hood on the fold of the red fabric, and cut around it, not cutting the folded side. (basically a rectangle with a curved corner) then i sewed the seam up the back, and a hem around the face.
To make the ties, I cut a strip of fabric, about 4 inches wide along one end of the fabric. i cut it in half so i had 2 22"x4" strips. folding the peices right sides together, i sewed a seam along the edge and one end and turned it right side out.
For the cape, I pressed and sewed a seam along the 2 sides and bottom of the cape.
To attatch the hood and ties to the cape, I folded and pressed a 5/8" seam along the entire top, then centered the hood on that edge of the cape. Then, right sides together, I pinned the hood and ties on and sewed a seam along the entire edge, reinforcing the stitches where the ties were attatched.
Ta-Da a hooded cape. I did not however prewash the velvety dark bright red fabric, so my hands, sewing machine and clothes I wore were tinted red. oh well.
For the apron, I followed a pattern I bought at walmart. had I thought ahead of time, I could have found an appropriate apron for less $ than the materials and pattern, but I enjoyed sewing it, and have pride in having made it myself. HS Sewing 101 was a long time ago.
For the Big Bad Wolf, originally we planned to attatch peices of faux fur (remarkably hard to find, wasn't at JoAnns or Wal-Mart) to a brown sweatsuit. Then we decided we wanted the wolf to be dresses in Grannies clothes. We scoured a thrift store for a nightgown, but ended up getting one at KMart (my hubbys a big guy, needed womens 4x size).
After putting the gown on, we found that only the hood, neck and ankles of the sweatsuit even showed, so remembering our budget and body temperature when my hubby will be drinking at the party, we decided to scrap the sweatsuit and return it for $20 back.
He had some old ratty sweat pants that I stitched, essentially faux fur leg warmers, to.
For the hood, I made a hood similar to the Red Riding Hood, only i left the seam around the face big enough for a drawstring, and made it longer so it would drape down his neck.
For the chest, I just cut a rectangle with a neck sized hole out of it, then a cut in the back. this was wrapped around his neck, laying on his shoulders and chest, and safety-pinned in the back.
I had intentions of makeing glove type things for his hands, but ran out of time.
The great thing about my costume, it was super comfertable and warm. Other girls at the party were in short skirts, as one admitted after a bunch of drinks "a lotta lycra under here" and high heels and not comfertable. Mikey lost his chest peice, then pants, and eventually his hood/make up before too long, and ran around in this nightgown most of the night. At that point he was pretty comfertable...


