Showing posts with label Christmas. Show all posts

Monday, December 27, 2010

super cheap/easy wine glass charms!

I've seen lots of wine glass charms for sale from everywhere from the Dollar Tree to The Container Store to various craft stores and K-Mart.

Although I loved the idea, I didn't think we needed them, because we rarely served wine or champagne and didn't even have wine glasses until our wedding gifts were opened.

Then, at Thanksgiving, 2 of my aunts raided my ribbon collection to tie different colored ribbon to their glasses to tell them apart, I decided I should consider getting (or making) some.

I came across this blog post showing off these gorgeous charms, and I was inspired:


Remembering the ribbon raid at Thanksgiving, and knowing we would be hosting Christmas, I decided to make something to label wine glasses this time. I didnt have the desire to make something as fancy as Tamara did at Etceroize, and wanted to make them for free (stuff I already owned).


I had come across a package of red/white/green "chenille stems" aka "pipe cleaners" when I was unpacking Christmas stuff. I had bought them for another project years ago but didn't use them. I thought cutting tags or other die cuts out with my Cricut, but I wanted this project to be even easier than that. Having just recently organized my Christmas gift wrap similarly to how I did my generic gift wrap I remembered some little card gift tags on strings mixed in with the peel and stick gift tags.


So I had the general idea in mind and got to work:


I measured the pipe cleaner and found about 1/2 is perfect for my wine glasses. cut them all in half.

I twisted the pipe cleaner around the stems and then removed them.


I tried hole-punching the tag hole bigger so it can be strung directly onto the pipe cleaner but didn't like how it looked, and it started ripping. So instead, I wound the string (that was already on the tag) around the end of the pipe cleaner a bunch of times, so it only dangled down a bit.

Then, to hold the string in place better, i folded the tip of the pipe cleaner back on itself over the string.


There were about 6 different gift tag designs in the set. While winding the pipe cleaners I found that the red white and green colors were actually 3 smaller pipecleaners twisted together, so I untwisted them to make even more design combinations. People could have written their name on the back of the tags, but this made theme easier, and re-usable.

I made 4 of each tag design, a tri-colored one and one of each color. I left one on a glass stem and put the rest inside the glass for display, so people can choose the tag they like and put it on their either wine or champange glass.

I very much enjoyed my snow man on white stem with my martinelli's sparkling cider, and made it easy to spot my glass, even from across the room.


Not a lot of people drank wine or champagne or sparkling cider at our gathering, but these were so easy and cheap to make, that I wasn't disappointed more of them didn't get used, I can pack them away and use them again next year!

this project could also be done with gift wrapping ribbon / store bought or home made tags also, if you don't have pipe cleaners. Lke Tammy at The Sweet Spot made with her new craft toy

Cost of this project:
for me: $FREE
if starting with none of the supplies: about $2
The gift tags came from the Dollar Tree a few years ago.
I estimate the pipe cleaners were about $1 / package also.
Time: maybe 30 minutes, not much time at all.

Sunday, December 12, 2010

Christmas Goody Making Party!

For years we have been getting together to watch the annual holiday parade downtown, this year it was canceld, big bummer! Aunt Sarah had the idea to get together to make Christmas Goodies instead.

The party was a huge success.

Everyone brought ingredients and supplies to make a recipe or 2 and we all went home with trays and trays of super festive goodies.

I made these Snowball cookies. Cuzzy Jenny informed me they are also called "Sandies" (I didnt think sandies were coated in powdered sugar) I informed her it is winter, so therefore theyre called Snowballs, in the summer, at the beach, she can call them Sandies.

I got the recipe from Annie's Home:
Snowball Cookies (her picture)

The Recipe:
1 c. butter
1/2 c. confectioners' sugar
1/2 tsp. salt
2 tsp. vanilla
2 c. sifted flour
1 c. chopped pecans or walnuts
Additional confectioners' sugar (for rolling)

Preheat oven to 375°F. Beat butter and sugar until light and creamy. Add remaining
ingredients, mixing to combine. Use a teaspoonful of dough and roll into small ball. Bake for 12 to 15 minutes. Cool slightly and roll in confectioners' sugar.

I followed the recipe for the ingredients but I stopped reading the recipe
after that. Sister-in-law Rachel and I decided to add more sugar, about 1/3 a cup because dough didnt taste sweet enough. Also mine turned out larger and not as round because I used a #40
disher (my new favorite kitchen tool) to scoop the balls out on to the cookie
sheet rather than rolling in my hands. Hers were prettier.

my picture: I also made


Cherry Balls
I got the recipe from Echo's of Laughter

These were super easy and a favorite of all the other elves at the party. I doubled the recipe but I should have tripled it!

her picture:
The recipe:
1/2 cup butter
1-1/2 cups coconut
1-1/2 cups icing sugar (powdered sugar)
1-Tablespoon milk or water
1/2 teaspoon almond flavoring
1 small bottle maraschino cherries
graham cracker crumbs

Directions:
Drain cherries well and pat dry. (we did this while the dough was chilling) Beat butter, coconut, icing sugar, almond flavoring and milk or water with mixer.
Chill for a bit in the fridge.
Using a teaspoon, take portions of dough and wrap around a cherry. Roll in graham cracker crumbs.
I like to place the balls in little decorative paper cups. (this is a super perfect idea! mine are in mini muffin cup size)
This recipe can be made ahead and kept in the freezer for up to 2 months. (i dont think theyd last that long)
Very yummy.
Very messy on the hands. (we learned to eat one all in one big bite)

I intended on buying butter, but forgot, so I used I Can't Believe Its Not Butter. And I COULD believe it WASN'T butter because the dough didnt harden very well, so I recommend using actual butter. They were still tasty though!
One of the commenters on her blog post suggested chocolate cookie crumbs rather than regular graham crackers, and I prefer chocolate, so I went with that idea and had my 4 yr old newphew crush up (toss around a ziplock freezer baggie of) chocolate grahams. for a double recipe he crushed up a full brick (1/3 of the box) + about half of another brick and we had some leftover crumbs.
Aunt Sally did the cherry wrapping, and found it was easier to work with the dough when it was cold, and her warm hands didnt help, making it difficult to work with (probably harder having used imitation butter) so after re-chilling the dough and chilling the cherries, she used a #40 disher to scoop the dough, squished a hole in the middle, added the cherry and covered the cherry. plopped the ball into the cookie crumbs. my picture:
Oreornaments:
Aunt Sally had the right idea to make semi-homemade goodies after seeing the idea in a magazine.

She brought store bought fudge covered Oreos, cookie icing, sprinkles and cut strips of fruit leather into "ribbon"
with help from my sister Lenna, made these: I named them Oreornaments

She also made some with the chocolate fudge covered Oreos with white icing.

We found when working with 2 colors of icing, let the first color set a few moments before adding the 2nd color to prevent them from melding together. Also for some designs, she practiced the shapes on wax paper first.

After the party, I was relaxing on the couch reading Woman's World Magazine
and actually found an article about a very similar idea, only it includes how to coat the Oreos in chocolate yourself, and other super great goody ideas!

Being as smart as she is, Cuzzy Sabrina had brought some leftover jumbo chocolate chips she had, (just incase we found a use for them), and I had leftover Marachino Cherries, someone had the great idea to combine the 2.
Chocolate Covered Cherries
the recipe:
dunk drained and patted dry marchino cherries in melted chocolate chips, place on wax paper or into paper cups to harden.

(the Cherry Balls Recipe above called for cherries without stems, but if you're making just these, I would recommend getting them on stems for easier dunking and pretty presentation)
Jenny melted the chocolate on a makeshift double boiler (metal mixing bowl over sauce pan of boiling water). We dunked the cherries into the chocolate and out onto wax paper.

after the first batch, I remembered I had some tiny paper cups in my box of Christmasy recipe stuff, and they were the perfect size for the cherries, so for the 2nd batch the cherries were put directly into the paper cups after dunking.

here is a picture of the cherries from the first batch after moving them into the cups, not as pretty as the ones moved directy into the cups.

We really liked the look of the cherries poking through the chocolate.

Mom made:

Peanut Butter Snappies aka Ben's Favorite Cookies

(Recipe here)

Sabrina made:
Rocky Road

we found it would have been easier to start with preroasted and skinned peanuts, roasting and peeling was the most difficult part of the recipe... placing the chunks into paper cups made it much less messy and prettier when we put a few of these babies onto the trays and in boxes and tins.

Aunt Sarah made some most decadent
Lemon Fudge
Lemon fudge combines a silky smooth white chocolate fudge with the vibrant taste of tart lemons. I think this refreshing candy has just the right combination of sweet and sour citrus.
This recipe calls for lemon oil, which is a super-concentrated flavoring with a strong lemon taste. If you don’t have lemon oil, you may substitute lemon extract, but you may want to add more, to taste, to ensure that the lemon flavor is strong enough.

Prep Time: 15 minutes
Total Time: 15 minutesIngredients:
•2.25 cups sugar
•3/4 cup evaporated milk
•1.25 cups (9 ounces) white chocolate chips
•1 stick (4 ounces) butter, cut into small pieces
•1 tsp lemon oil
•zest of one lemon
Preparation:
1. Prepare an 8x8 pan by lining it with aluminum foil and spraying the foil with nonstick cooking spray.

2. Combine the sugar and evaporated milk in a medium pan over medium-high heat. Stir continuously while the mixture comes to a boil. Once it is fully boiling, continue to cook, stirring constantly, for six minutes.

3. After six minutes, remove the pan from the heat, and quickly stir in the butter, white chocolate chips, lemon oil, lemon zest, and a few drops of yellow food coloring.

4. Stir quickly to melt the butter and white chocolate, and continue stirring until the fudge is homogenous and smooth.

5. Pour the fudge into the prepared pan. Allow it to set at room temperature for at least two hours. Once set, cut it into small squares to serve. Lemon fudge can be stored in an airtight container at room temperature for several weeks.

I had picked up a bag of tiny twists pretzles when Wal-Mart didnt have the square "window" pretzles I wanted for a recipe I saw on My Computer is My Canvas

I will be making these soon:
I ended up finding the square Snyders of Hanover pretzles I wanted at Winco, so I brought the twists along for the party. Aunt Sarah had leftover white chocolate chips from her fudge, so we melted them for my neice Baylee and Sister Lenna to dunk the tiny twist pretzles in, some were sprinkled with peppermint sugar.
Not pictured we also had M&M cookies, Cherry/Strawberry cake mix cookies, and chocolate carmel fudge.

We found it very nice to put most of the items into paper cups when we made up all the trays of goodies for either ourselves or to give as gifts. Cuzzy Jenny brought some store bought candy to go with the goodies on the trays.

Overall, this was a great way to spend an afternoon with friends and family and I hope we continue the tradition even after the Parade comes back into town next year!

Wednesday, December 8, 2010

{30 Day Blog Challenge} Day #8

Day 8 - A song to match your mood.

well, my moods change a lot, so I'm changing the challenge topic to it to

{Favorite songs right now}

"My Grown Up Christmas Wish"

and

"Was He A Boy Like Me?" by Veggie Tales (free download available at Amazon currently)
( check out my post on free downloads here )

and

"Christmas Shoes"

Friday, December 3, 2010

Bow Wreath, the lazy way.

Im sure you have seen something, In a home goods store, craft fair, thrift store, or favorite etsy store, and thought, "hey, I could make that!"

Sometimes, you have to stop and ask yourself "but will I?" "how much is it worth to me to have been the one to have made it?" "Will mine even turn out better?" "How much will the supplies cost?" "how much time do I want to put into this?"

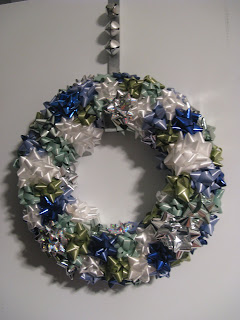
I had one of those moments at the Humane Society Thrift store one day looking for cheap Christmas decor when I saw this:

Thinking, "thats just a bunch of store bought bows glued to a wreath form. Ive worked with wreath forms before (spring and 4th of July) , I can make that"

I took a look at the back and sure enough, theyre just hot-glued on there.

and then I noticed the price, $2. hmm there are lots of goodies in my shopping basket already... I have some random bows in my Christmas wrapping box, and even more I found when I organized my other wrapping supplies. But I wasnt sure if I would have enough of coordinating colors, but bows are cheap right? Then I remembered that the only wreath forms at Dollar Tree were pretty small. I decided that making a wreath like this would cost more $ and take lots more time than buying it.
Although I get satisfaction in crafting, I knew I would have lots to do this month, and I would be prouder of other craft items, I didnt need to make a wreath for this holiday too.

So I gave my $2 to the poor homeless animals and saved myself time, energy and money.

There are lots of great wreath ideas out there, but I needed something that is weather resistant. we have NO cover or overhang of any kind out our front door, yet.

Here is a great looking wreath from Atelier Caroline

I'm thinking I have bunches of tulle left over from the wedding, and tulle is cheap, and for the most part water proof, so I might make one like this for the other door...


Tammy from The Sweet Spot made her wreath using stuff from the Dollar Tree:


Im thinking, could even be done with pieces of plastic shopping bags from the recycling and a bent wire hanger as the base...

Alex at Crafting with my Cub even made her gorgeous wreath for $6.

I have lots of miscellaneous ornaments and a blank wreath I could attatch with hotglue...

Nope, (so far), Ive taken the easy way out. Don't judge, I'm toting around a canteloup in my belly, just came off a 3 day migraine, and Dad-in-law just came home after 11 days in the hospital. So Im not ashamed of my lazyness.

Im linking to A Little Knick Knack's EBTKS Party

and

Momnivore's Creative Juice Thursday

and

Somewhat Simples Winter Holiday Party

and

Vintage Wanna Be's Talent Tuesday

Tuesday, November 30, 2010

Free Music!

Searching for music for our wedding, I found that sometimes, Amazon does free music downloads, I was like WTH? nothing in life is free. I thought I aughta give this a try though, this wedding is costing a pretty penny. So I clicked on the song that said FREE where the price goes and downloaded it. No problem, no charges or anything! I went on to get a bunch more.

At the time, I thought, "wow, I need to share this, eventually when the wedding is behind us, not less than 2 days ahead of us" (yes I waited until the last minute to do music)

Sitting here, a few weeks later, reading The Thrifty Home, I remember about Amazon's free wedding music and decided to search for Christmas music. (in the past I bought Christmas CDs for dirt cheap at thrift stores garage sales and the Dollar Tree. I'm sure I have plenty, but heck they're free.

Here is what Amazon will look like if you go to the MP3 downloads section and search "Christmas"
Then click "sort by" and then price: Low to High

as of now, there are 53 free Christmas song downloads, several will be available soon.

I was thinking, "is it worth the time to go through and download each song?" YES especially because some of them are on full albums that are free, reducing the amount of time and clicking to get the songs. Ahh. Easy, Free, Untimeconsuming, and Christmassy. 4 of my favorite adjectives!


I think I might just make a copy of this one for my neices and nephews. As a Thanksgiving gift, since I dont like giving Christmassy gifts on Christmas. Although I know they would enjoy it year round!
im linking to:
and
and
Its a Blog Party's Home for the Holidays
and
eta: i wrote this back in october, but since people are actually thinking about christmas now, i thought i would bump it up to the top!