Wednesday, November 3, 2010

gift wrap organization.

So, to be green and to save green, I am always saving gift bags, tissue and ribbons. The reuseable gift wrap in addition to rolls of paper, greeting cards and gift tags have, for years, just stored in a long tote. It seemed however to just get fuller and less organized as time went by. Recently when wanting to wrap a gift, I had to all but dump the entire box out to find the right sized bag, or right color tissue paper.

Then to make matters even less organized, came the bridal shower and wedding gifts. The influx of gift wrap made some changes to the organization nessesary.

This does not include any specifically Christmas wrapping stuff, it has its own box in the attic it only comes down when the Christmas decor does, I can wait to wrap gifts for now.


~~~~First, the before:

~~~~~2nd: take everything out of the tote and sort it:
I decided that the best place for all the gift wrap(for now) is back in this box. It is as large of real estate as I wanted to allow the gift wrap to take up, its perfect lenth for wrapping paper rolls, and most everything fit inside before it was organized.

~~~3rd: put it back, but organized this time,


From my previous efforts to organize this box, I know that the rolls of paper should go along one side, stacked up (rather than along the bottom, where they'd get buried, or the top where theyd be in the way).

I rubber banded the rolls, and tucked scraps of paper inside an empty tube (I opted to use the empty tube, rather than a full tube because it will remind me there is paper inside, rather than forget there is blue paper inside the flower paper roll. )


To keep the rolls from rolling across the bottom of the tote, I inserted a shoe box (that previously housed bows and ribbons) this kept them all stacked nice along one side. (this later was moved)


Let me share an easy tip for next time you open a roll of paper: Slide the paper out of its cellophane sleeve, cut a piece of the sleeve off, and then slide the band of cellophane back onto the roll when youre done wrapping.
No need to find a rubber band, no icky sticky tape to tear off next time, and its right there, and free. (You can even make a few extra bands, for previously opened paper you already have in your bin) And no unrolling!

Another gift wrap organization tip: Buy generic paper, its often cheaper, and you can use the same roll for multiple different occasions, for boys or girls birthdays, for anniversarys (really, how many anniversary gifts will you give this year?) baby showers etc. just dress it up with ribbons, bows, stickers etc. Ive been doing this long enough most people know which gift is from me, because of the solid colored paper. This prevents you from having a different roll (or 2) for every gift giving occasion to store. (Same idea goes with ribbons and bags, the receiver can reuse the bag for any occasion) Next, I started putting in the gift bags, somewhat organized by size. The larger ones had to be folded against their natural folds, to make them fit and not flop open, I used some tape.


all the bags go in the box:


But I'm not done, thats not all I took out of the messy box.


I found a bunch of small bags and boxes (you would think I get a lot of jewelry, nope) all the bags and boxes were nested inside another box I had been saving for gift wrapping.


Dont forget all that ribbon (a lot of leftovers from my Spring Wreath):

Gift tags always got lost amongst the bags and tissue, now theyre all together in a Ziplock:


Another thing that found a new home in Ziplocks, tissue paper:


Each color got its own bag, easy to find the right color for the gift! (mostly organized Roy G. Biv style, I love that guy)

~~~~Now, the moment we have all been waiting for (some longer than others):

You will notice I have a baggie for the tape, pen, and Paper Cutter having it all handy makes for easier wrapping, they all go back in the box when wrapping is done.
I highly reccommed the Scotch brand wrapping paper cutter. Its important to get the one designed for wrapping paper (rather than other crafts) because it has a little bump thing on the back for curling ribbon(others do not). The paper cutter makes easy work of cutting wrapping paper straight, and the tip is great for peeling up price tags. It takes less space than scissors, safer for kids to use, and, wont get stolen out of the gift wrap box to be used for other purposes. (most ribbon can also be cut with it). I used to have a small pair of kids scissor in the tote before i found the cutter.


I have a seperate one in my Christmas Wrapping paper box, so I dont forget it on one box or the other and have to go up in to the attic to get it for January birthday gifts.


Note: Now I had originally thought I would have to keep out the specifically "wedding" gift bags(I had soooo many), tissue and ribbon, but I ended up having plenty of space for those in this box, all the bags are together, same with the tissue and ribbon though, so that I can find them easily, and if need be, move them to a smaller, seperate bin later on.


Eventually, I would love to have a space like Jenny Free Style has, check her out! She shows how to make the organizer board on her post!

gorgeous and fuctional!


I'm linking to We're Organized Wednesdays at Organize and Decorate Everything

and Iheartorganzing Gift Wrap link list

Tuesday, November 2, 2010

Craft Room Overhaul Begins!

So my craft room, as you will soon see, needs a major cleaning, organizing, repurposing, OVERHAUL.

We went from moving in, to wedding(crafts, getting dressed, gift storage) to halloween (costumes, storing stuff that was cluttering our other rooms) and only really stopped to clean (aka, push things in the corners) once.

Before I start with the Christmas crafts (and soon after that, have a baby) this must be fixed!

So brace yourself, here are the BEFORE pictures.
Scarey I know, but I do enjoy organizing, sometimes, so this will be fun, right?.

The 1st thing I did, was pack up all the sewing stuff. for 3 reasons: A. Rediculously sheddy faux fur from a wolf costume, and 2 I very rarely sew (last time was 3 years ago I think, for halloween) so the machine, fabric, and notions all go in 1 box, that doesnt have to be easily accessable, and D: It was the latest project, so everything from the box is near the top of piles.

I folded up all the leftover scrap fabric, it, the machine, cords, and any notions I found around the room, went into the box. The box got its lid and was moved out of the way.
~~~~~
Next, I closed my eyes, and pointed randomly at the cluttered shelf, to pick something to get me started on my next project. The leftover goodie bags from the wedding and extra cheap toy/favor stuff I had placed next to them(when I was cleaning elsewhere in the house, like items together were at the end of my finger.

I dumped all the bags out, fit all the non-candy contents into a ziplock, moved the candy to the halloween bowl, and tossed the ties and crumpled bags. Then, along with the other favor items, they went back into the cute blue box (from when they sat out at the wedding) went onto a shelf.

~~~~~~~

Now that I had a (mostly) cleared-off table again, I was ready to do one of my favorite organization techniques, start some SORTING boxes/bins/baskets.

With whatever misc boxes,bins, etc I had around, I started sorting things into them. I made quick labels for the boxes from scrap paper, tape, and a sharpie(since theyre temporary). I continued to fill the boxes up. eventually, the "OUT" box was full, I took out all the "KITCHEN" items out and started a new box for that. When it was full again, and I started a "BEDROOM" box. I had boxes for: "OFFICE" (supplies)"TO FILE", "KEEPSAKES"(paper-ish items to go in scrapbooks)"SBOOK SUPPLIES" "GLUE"(glue sticks, glue guns, craft glue, were all not where they belong) and a few others.

I had multiple "misc. stuff" boxes that had been created when I had cleared off surfaces on multiple occasions ever since I moved in. One by one, each box, bag, drawer, got sorted into the SORTING boxes.

Along with my trusty stack of scrap paper strips, I also labled boxes I had previously started for "CHRISTMAS GIFTS" "WEDDING" "DOWNSTAIRS". with each new box, I looked around the room to find items to add to the box.
~~~~~~
The next leg of my journed needed to be the corner next to the freezer, its higher purpose is to be a pantry wall, not a baby changing table covered in misc random"throw it in the corner" stuff. It needed to be next because takeing up precious space is an unassembled wire pantry shelf unit, and an unassembled food can organizer, both need new homes. On the wire shelf when anything "pantry" around the room, there were: 2 bags of sugar, almost empty large jug of vegitable oil, waffle iron, lunch bag, Big Top Cupcake pan, and some serving platters. In my living rooms was this: a table of wedding gifts (and some randomness) many gifts were pantry items.
they moved to the wire shelf, the gifts to return (or exchange, rather) went in a stack by the door, the random stuff, well, I wont lie, its still on that card table.

All the pantry items went to the wire shelf, then, I went shopping for Thanksgiving food, and added that to the shelves. I know this looks crazy full, but that is temporary, until my darling husband assembles this bad boy:
This will fit beautifully between the wire rack and the wall. (currently this is in 2 boxes, one in my office and one big one in the living room, but it requires lots of space to assemble the in-laws also have one in their garage). The food items on the wire shelf will move to the can spaces and empy shelves of the Shelf Reliance rack, and a few more kitchen items will then fit onto the wire shelves, clearing up another cupboard that would rather be used for other things. (basically were playing musical storage spaces)
~~~~~~
More transformations to come...

Sunday, October 31, 2010

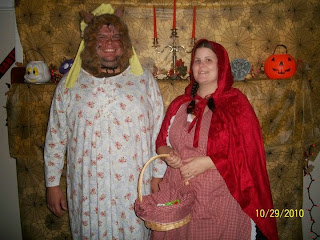
why grannie, what a big nightgown you have.

Owoooooooo! Who's that I see walkin' in these woods? Why, it's Little Red Riding Hood. Hey there Little Red Riding Hood, You sure are looking good. You're everything a big bad wolf could want.

So I didn't take pictures as I made our costumes but wanted to share them anyway.

After much deliberation over a fun couple's costume, we decided on Little Red Riding Hood and the Big Bad Wolf.

First I looked at a pattern to make a Little Red Riding Hood costume (couldn't find a premade maternity one at the stores), but thinking of my time, sewing skills, and budget, I decided to make the hood and apron and wear clothes I already had.


for the hood, I used a hoodie, laid it with the top of the hood on the fold of the red fabric, and cut around it, not cutting the folded side. (basically a rectangle with a curved corner) then i sewed the seam up the back, and a hem around the face.

To make the ties, I cut a strip of fabric, about 4 inches wide along one end of the fabric. i cut it in half so i had 2 22"x4" strips. folding the peices right sides together, i sewed a seam along the edge and one end and turned it right side out.


For the cape, I pressed and sewed a seam along the 2 sides and bottom of the cape.

To attatch the hood and ties to the cape, I folded and pressed a 5/8" seam along the entire top, then centered the hood on that edge of the cape. Then, right sides together, I pinned the hood and ties on and sewed a seam along the entire edge, reinforcing the stitches where the ties were attatched.

Ta-Da a hooded cape. I did not however prewash the velvety dark bright red fabric, so my hands, sewing machine and clothes I wore were tinted red. oh well.


For the apron, I followed a pattern I bought at walmart. had I thought ahead of time, I could have found an appropriate apron for less $ than the materials and pattern, but I enjoyed sewing it, and have pride in having made it myself. HS Sewing 101 was a long time ago.

For the Big Bad Wolf, originally we planned to attatch peices of faux fur (remarkably hard to find, wasn't at JoAnns or Wal-Mart) to a brown sweatsuit. Then we decided we wanted the wolf to be dresses in Grannies clothes. We scoured a thrift store for a nightgown, but ended up getting one at KMart (my hubbys a big guy, needed womens 4x size).

After putting the gown on, we found that only the hood, neck and ankles of the sweatsuit even showed, so remembering our budget and body temperature when my hubby will be drinking at the party, we decided to scrap the sweatsuit and return it for $20 back.

He had some old ratty sweat pants that I stitched, essentially faux fur leg warmers, to.


For the hood, I made a hood similar to the Red Riding Hood, only i left the seam around the face big enough for a drawstring, and made it longer so it would drape down his neck.

For the chest, I just cut a rectangle with a neck sized hole out of it, then a cut in the back. this was wrapped around his neck, laying on his shoulders and chest, and safety-pinned in the back.

I had intentions of makeing glove type things for his hands, but ran out of time.

The great thing about my costume, it was super comfertable and warm. Other girls at the party were in short skirts, as one admitted after a bunch of drinks "a lotta lycra under here" and high heels and not comfertable. Mikey lost his chest peice, then pants, and eventually his hood/make up before too long, and ran around in this nightgown most of the night. At that point he was pretty comfertable...

Saturday, October 30, 2010

invite this guy to your halloween party

I got the idea for the super yummy mummy from a Taste of Home Halloween fun food magazine, where they had used cheese logs covered in piped cream cheese. well cheese logs are expensive and never get eaten all the way. I had already planned on making brownies (got a new brownie pan & brownie mix for a wedding gift) and I had leftover home made cream cheese frosting from wedding cupcakes.
Wilton Bake It Better 12-Cavity Bar Pan
The brownie pan only made a little under 1 box of mix, so I used a regular small rectangle cake pan (also a wedding gift) for the rest of the batter. Using a regular knife I shaped the head/torso out of the full pan and added the individual squares as the appendages, and cut them in half for the shoulder/hips(cut on diagonal) and arms (cut lengthwise). The legs are 2 full bars. Some scrap from around the head became the eyes.

Then I cut a slit in a freezer Ziploc (usually I use cheaper storage Ziplocs, but the cream cheese was cold and i didn't want the bag to split) to pipe on the bandages.
total project cost
$FR.EE, (well whatever about a cup of oil and 4 eggs and an hour of electricity costs)
but if you weren't gifted the brownie mix and didn't have leftover frosting, it would cost about $3ish for the mix, cream cheese, powdered sugar, eggs, oil etc.

Tuesday, June 29, 2010

our door is patriotic.


so i found so many great wreaths after i found the one that inspired me to make my spring wreath when i found inspiration for this one in the July 2010 Good Housekeeping


i had to make it. but i didnt like how some of the flags were upside down. but to make it full enough without upside-down flags, i thought first of using curling ribbon like Embellished Bayou did last spring but at the dollar tree, i could get either $3 of curling ribbon, or about $6 of pre-curled ribbon, or $1 for a red white and blue tinsel garland. and well im on a budget, and i didnt want to copy my spring wreath too much. so garland it was.

i made 2, one for our home and one for my Aunt and Uncle's house, they always host a great fireworks show and bbq on the 4th.

each wreath cost $2.10 (i made 2 for $4.20)

the base is a styrofoam circle $1 dollar tree.
the garland was also from the dollar tree for $1 but only used half of the garland on each wreath
(you can raid christmas decor for the garland red, blue or silver would work)
the flag picks were from Joann Fabrics. was 40% off of $2 so $1.20 there were more than enough of them for both wreaths, extras can be used on food on the the 4th or can make it fuller.

i painted the styrofoam base with leftover paint from a previous project then wrapped the garland around the base candy-cane style. I used a regular office stapler to attatch it.
then, i just poked the picks in. i broke some of them to make them shorter to fill in better.

im linking to It’s A Blog Party 's 4th of July Party! and Centsational Girl's Stars and Stripes party

Friday, June 11, 2010

itchsulation

just about finished! poor Mikey was all itchy. he learned a lesson the hardway. wear long sleeves and gloves.
thanks to google, we learned also to run skin under very cold water to close the pores so the fiberglass cannot get in deeper. then use a lint-roller-esque sticky side out roll of good tape, we used packing tape, duck tape was also recommended

Tuesday, June 8, 2010

sheetrockmobile!

note to self: job i dont want, sheetrock delivery person. those guys worked really hard and earned their tip, a bottle of silver cuervo.