here is a quick tutorial.
First, buy whatever Avery (or off brand if it says the Avery product # on it) label product you think will work for you. I labeled items under my bathroom sink with 2x4" shipping labels.

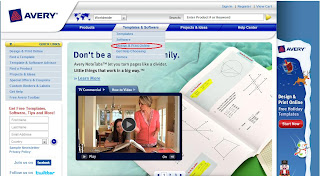
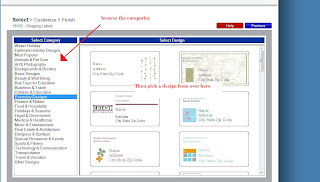
Their website will look something like this. At the top, between "Products" and "Projects and More" is a tab for "Templates and Software" click that and in the drop-down menu find Design and Print online. (circled below) click that.
 then click Start Now
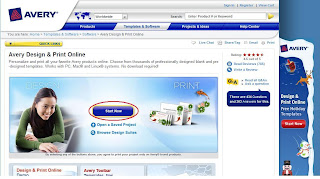
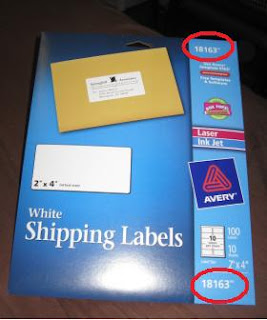
Locate the product number on the packaging.
 Enter it on the website:
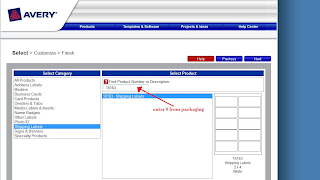
Enter it on the website:Click next. On the left, you will see categories of designs for your label. If you were making address labels for Christmas cards, there are bunches of choices. Click a category and browse the designs. Find one you like and click on it. When choosing, don't be concerned if you like an address label design, but are making labels for bins or something, you will be able to edit the design later. If you have a design saved as an image on your computer that you would prefer to use, just click on a design with text that looks like it would work, you can change the image later.
 when you click a design on the right, the next page will appear:
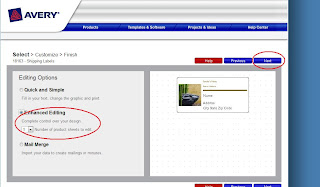 There are 3 options on the left, Enhanced Editing is the one I use, unless I am using an address list for mailing labels.
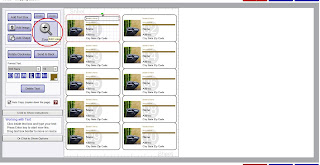 If you have a partial sheet of labels, I recommend just putting it in backwards, so there aren't any gaps at the top of the page. If you have already done that and have gaps at the top and bottom, and want to use labels in the center of the page, find on the left where it says Auto Copy
Un-check that box.
Now click on each element of the labels at the top of the page and delete each one, emptying the labels so it matches up with the sheet you will be printing on. Once the top spaces are cleared, re-check the Auto-Copy box. (circled below)
 when you click a design on the right, the next page will appear:
 There are 3 options on the left, Enhanced Editing is the one I use, unless I am using an address list for mailing labels.
 After clicking Enhanced editing, directly below that radio button (the little dot in the circle you click), decide how many pages worth of labels you will be making. The package tells you how many labels are on each sheet. For this project, I need less than 1 page. So I left it at 1.
Then click Next
This is what the next page will look like, but with your label design on the right.
Click the ZOOM magnifying glass.
Click the ZOOM magnifying glass.
 If you have a partial sheet of labels, I recommend just putting it in backwards, so there aren't any gaps at the top of the page. If you have already done that and have gaps at the top and bottom, and want to use labels in the center of the page, find on the left where it says Auto Copy
Un-check that box.
Now click on each element of the labels at the top of the page and delete each one, emptying the labels so it matches up with the sheet you will be printing on. Once the top spaces are cleared, re-check the Auto-Copy box. (circled below)
If you aren't going to need all the labels on the sheet, that is OK, we will get to that.
Find the first label on the sheet, and start editing it. (you will notice all the labels under it are also edited) 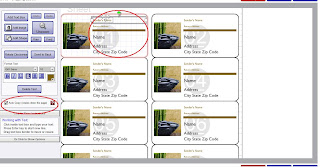 Click on each element of the label to make it look how you like, using the command buttons on the left for font, size, color etc. Here is what mine looked like after deleting all but the graphic and 1 text box, deleting all other decorative elements.
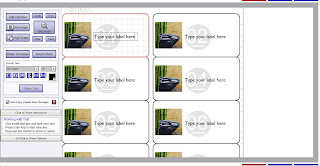
 Click on each element of the label to make it look how you like, using the command buttons on the left for font, size, color etc. Here is what mine looked like after deleting all but the graphic and 1 text box, deleting all other decorative elements.
 (if you have an image on your computer you would rather use, click the pre-loaded image and look for the option on the left that says From File. or if you want to browse more clip art, there is a button for that too. If you want different graphics on each one, un-click the Auto-Copy button, and edit each one individually)
Since I am making labels for multiple different items under my sink, I need to edit each label accordingly. The Auto Copy feature only copy's further down the page, (see picture below)
so after each one is edited, I move to the next one. Etc.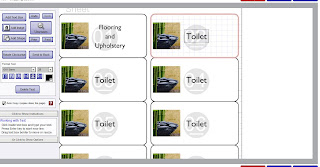 To scroll down on the sheet, click the zoom button again to un-zoom, click the label to edit then click zoom again, and it will be zoomed in on the part of the page you are working on.
so after each one is edited, I move to the next one. Etc.
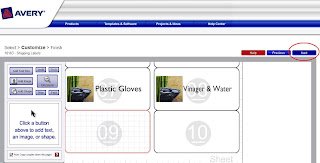
To scroll down on the sheet, click the zoom button again to un-zoom, click the label to edit then click zoom again, and it will be zoomed in on the part of the page you are working on.This is where I show what to do if you don't need all the labels on the sheet. After the last label you need, just click the elements on the next space and delete them, All remaining labels will be cleared. (as long as Auto-Copy is chosen)
See:
 When all the labels are filled in how you like them, click next.
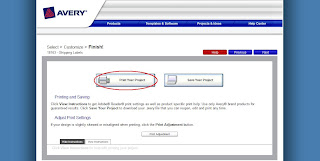
Put the sheet in your printer however you are supposed to for your printer. Then Click Print Your Project (or Save Your Project. If you have edited the labels in a way that you might use again, save it, you can also print it.)
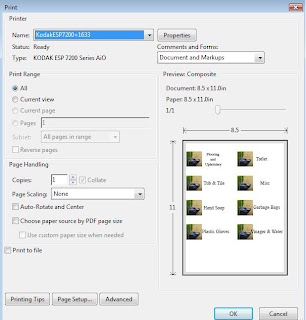
 This window (or one like it) will pop up, confirm printing properties and click Okay
 Your pretty fancy peel and stick labels will be born out of your printer. Enjoy!
When the package of labels is empty, be sure to clip the Box Top for Education and send to school with your little ones. (or save for a friend or family member with kids, or just drop off at a school near you)
 When all the labels are filled in how you like them, click next.
Put the sheet in your printer however you are supposed to for your printer. Then Click Print Your Project (or Save Your Project. If you have edited the labels in a way that you might use again, save it, you can also print it.)
 This window (or one like it) will pop up, confirm printing properties and click Okay
 Your pretty fancy peel and stick labels will be born out of your printer. Enjoy!
When the package of labels is empty, be sure to clip the Box Top for Education and send to school with your little ones. (or save for a friend or family member with kids, or just drop off at a school near you)
Now, although I wouldn't object to the idea, Avery doesn't imburse me for loving their products or raving about their website.
ETA:
OOOH so it occurred to me when I thought of how I stuck the labels onto note cards for baskets under the bathroom sink,

that I could easily just put a peice of cardstock into the printer instead of a label sheet if I wanted to cut the labels out and hang (hole punch and ribbon, for example) rather than peel and stick. Why not just design my own labels in Word or something? well if I want the design to match with peel and stick ones, and Avery takes the guess work out of lining up or formatting. I think I might just do that in my spice cabinet...


No comments:
Post a Comment